
Uff, I just looked at this recipe and it looks quite lengthy… But don’t fret! It’s just the first impression. As all yeasted goodness these buns require some rest time and some work time, but not so much of actual work. Unless you’re doing kneading yourself (as I did not so long time ago).
I am not sure if I mentioned that in Poland, and probably in surrounding countries as well, yeasted sweet breads and buns are pretty popular and easy to find. You don’t actually need to bake them yourself. On metro, train stations, anywhere where people are in a hurry, there are these little pastry shops that sell buns filled with all kinds of stuff. Farmer cheese and poppy seeds are the most common ones, I think, then there is fruit filling, and savory varieties. I used to buy them quite often in college when running from one class to another. The best time to grab one of those (beside breakfast) is around 11, when lunch is coming but not soon enough, or ~4pm when dinner seems so far away. Anyway, I grew up with them around and now I miss the familiar flavors. So I bake them myself now.
This recipe will yield ~20 buns, which is way too much for a family of 2 and a half. However they can be frozen and reheated later. Just pack them in a Ziploc and toss in the freezer. When you’re in mood for something sweetish reheat it. Each microwave is different, and bun’s size is also a factor, but mine takes 15-20 seconds on high. I know some people prefer to freeze the buns just before baking – I haven’t tried this option yet, but it should work fine too.
Ingredients:
The dough
- 17 oz. all purpose flour
- 0.5 cup sugar + 1 teaspoon
- 2 eggs
- 2 tablespoons unsalted butter
- 1 cup milk (warm, ~100°F-115°F)
- 6.5 teaspoon yeast
- pinch of salt
The filling
- 16 oz farmers cheese (1 package)*
- 5 tablespoons powdered sugar
- 1 egg yolk
- 0.5 teaspoon vanilla extract
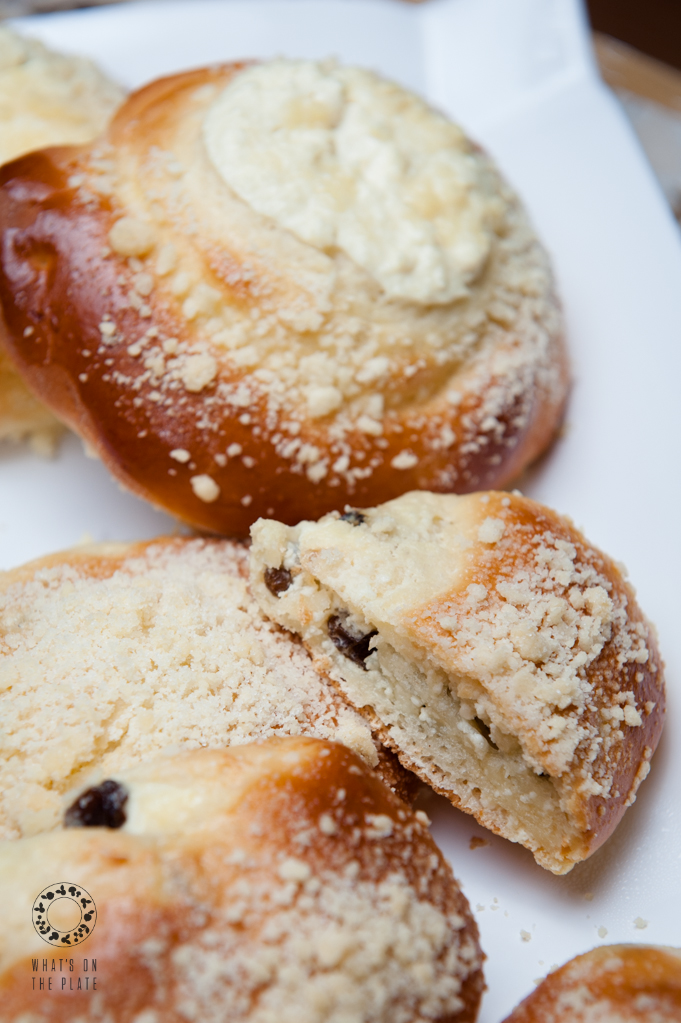
- raisins (optional)
Egg-wash (mix ingredients together with fork):
- 1 egg
- 2 tablespoons of cream OR half&half OR milk
Streusel (optional)
Instructions:
- Sift the flour and set aside.
- Melt the butter, set it aside to cool down.
- In a small bowl mix yeast with 1 teaspoon of sugar and 0.5 cup of milk. Let it stand for ~5 minutes, until it bubbles.
- In a mixer bowl put together flour, eggs, sugar, milk-yeast mixture, remaining milk and pinch of salt.
- Knead with the dough hook for about 5 minutes and add melted butter. Continue kneading until the dough is smooth and elastic, 10 to 15 minutes total.*
- Cover with plastic and kitchen cloth.
- Let it rest for 1.5-2hrs in a warm place, until it doubles in volume.
- In the meantime prepare the filling: mix well all ingredients (if you want the filling to be very smooth use immersion blender). Keep refrigerated until ready to use.
- After the rest period knead it again on low for ~5 minutes.
- Divide the dough in half.
- Roll it out until it is ~0.5 inch thick.
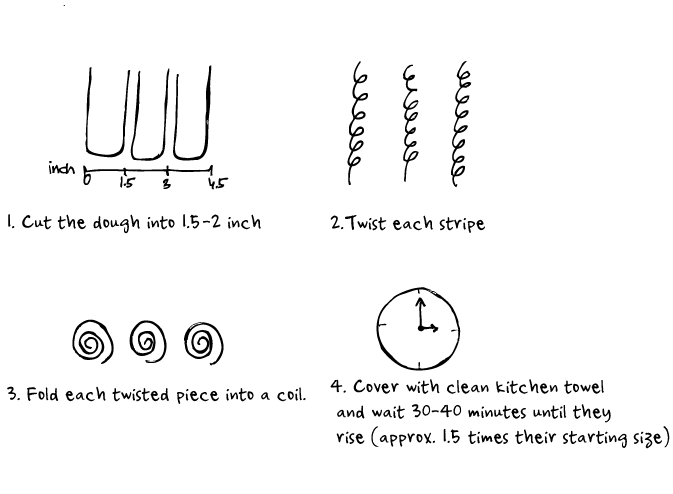
- Cut it into 1.5-2 inches wide stripes.
- Form the buns (see instructions below).*
- Prepare streusel (if using).
- Preheat the oven to 355°F.
- After they increased in size, with a clean finger, gently make a depression in the center of each bun.
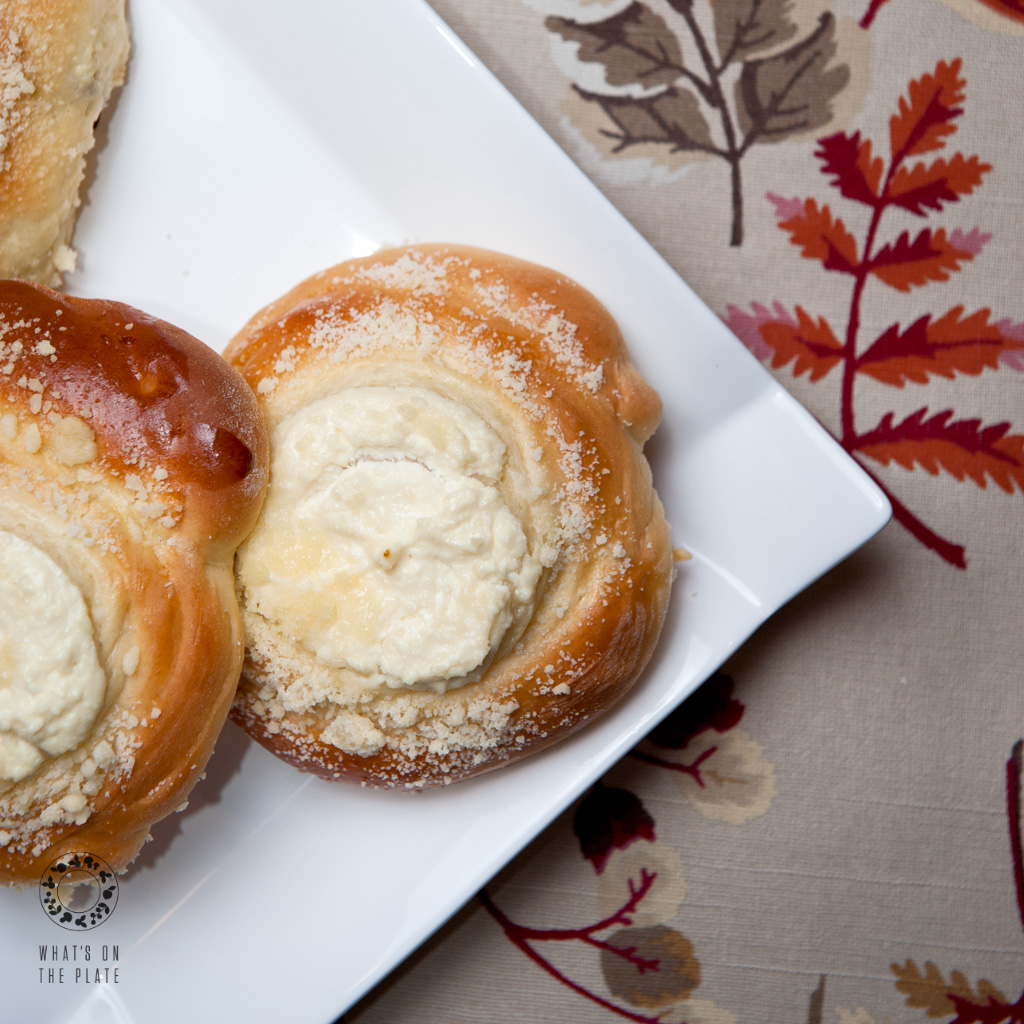
- Fill it with the filling (I used farmer cheese filling, but fresh fruits or fruits jams and spreads are another option).
- Brush with prepared egg-wash.
- Sprinkle with streusel (if using).
- Bake for ~18 minutes, until golden.
*Another option is to roll out the dough, spread the filling, roll it and cut it as you would do with cinnamon rolls. Then proceed with the raising time and start at step 18, omitting steps 16&17.
Yield: ~20 buns
Nutritional Info (1 bun, without raisins): Cal 171, Prot 6g, Carb 29g, Fat 3g, Fiber 0.7g
If you enjoyed this article, please consider sharing it!


This is the first time I saw a hand drawn step by step picture and I absolutely love it! SUPER cute and creative, and not to mention, so easy to understand the process!! I wish I am artistic enough to be able to explain by drawing then it saves a lot of time to take pictures of step by step! These cheese buns look so delicious too. You have a lot of dishes that I want to try… 🙂
Thank you for visiting and for such nice comment Nami! Hand drawn picture is the best I can do right now 🙂 so I am really glad you liked it. Hopefully one day I will be good enough with photos to post more of them 🙂
Where do you add the melted butter?
Hi! First of all I am so sorry for not seeing this sooner! Life has been crazy around here. Hope you’ll still see this.
Butter should be added at the end of the kneading, once the dough is well mixed. Thank you for catching that!
6 1/2 teaspoons of yeast????? is that right???
Yes, it is 🙂